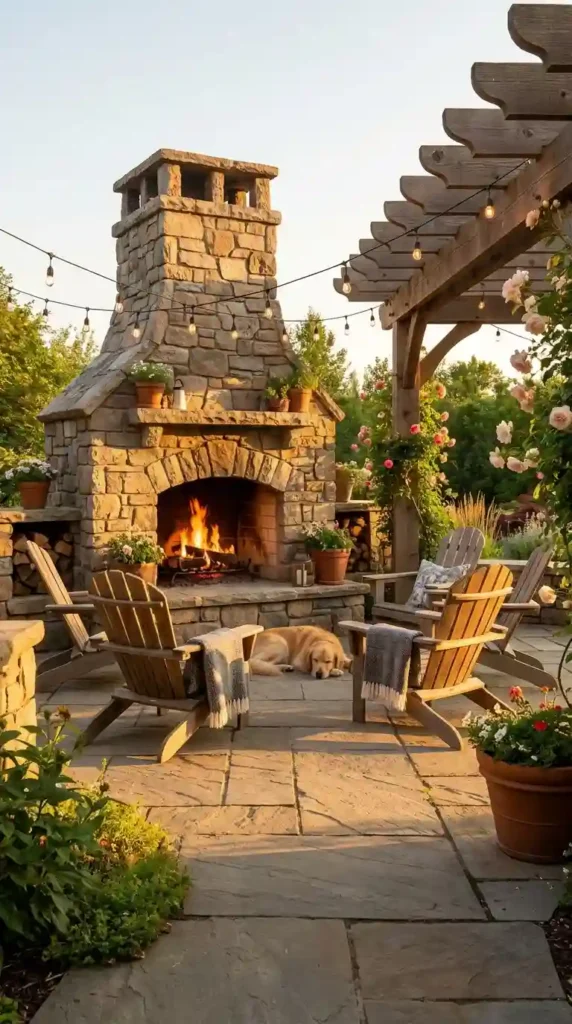
There is something about a crackling fire outside that just makes everything feel right. I remember the first time I sat beside a diy outdoor fireplace I had built myself in my backyard. It was a Saturday evening in October, the air had that perfect kind of chill, and my neighbors had wandered over without even being invited. That fireplace became the center of our outdoor life from that moment on.
If you have been thinking about building a diy outdoor fireplace, I want to tell you that it is absolutely something you can do on your own. You do not need to be a professional mason or have years of construction experience. What you do need is a good plan, the right materials, a weekend or two, and the motivation to create something lasting and beautiful for your outdoor space.
This guide covers everything from the very beginning to the very end. We will talk about choosing the right design, picking your materials, understanding safety, laying your foundation, building the firebox, and finishing everything off so it looks like it came straight out of a magazine. By the time you are done reading, you will feel confident enough to start your own diy outdoor fireplace project.
Also Read : The Best Outdoor Privacy Screening Ideas That Actually Work and Look Beautiful Doing It
Why a DIY Outdoor Fireplace Is Worth Every Bit of Effort
Let me be honest with you. Building a diy outdoor fireplace takes effort. It takes planning. It takes a few trips to the hardware store, some muscle, and a willingness to get your hands dirty. But what you get in return is something that no store-bought fire pit or gas burner can match.
A well-built diy outdoor fireplace instantly elevates the look and feel of your backyard. It gives your outdoor living space a focal point, a gathering place, a reason to spend more evenings outside. Your home value also goes up. Real estate experts consistently report that well-designed outdoor fireplaces add thousands of dollars to a property’s value.
Beyond the financial benefits, there is the personal satisfaction of building something with your own hands. Every time you light that fire, you will feel proud. And trust me, that feeling never gets old.
Understanding the Different Types of DIY Outdoor Fireplace Designs
Before you buy a single brick or mix any mortar, you need to decide what kind of diy outdoor fireplace you want to build. There are several popular styles, and each one comes with its own set of materials, skill requirements, and visual outcomes.
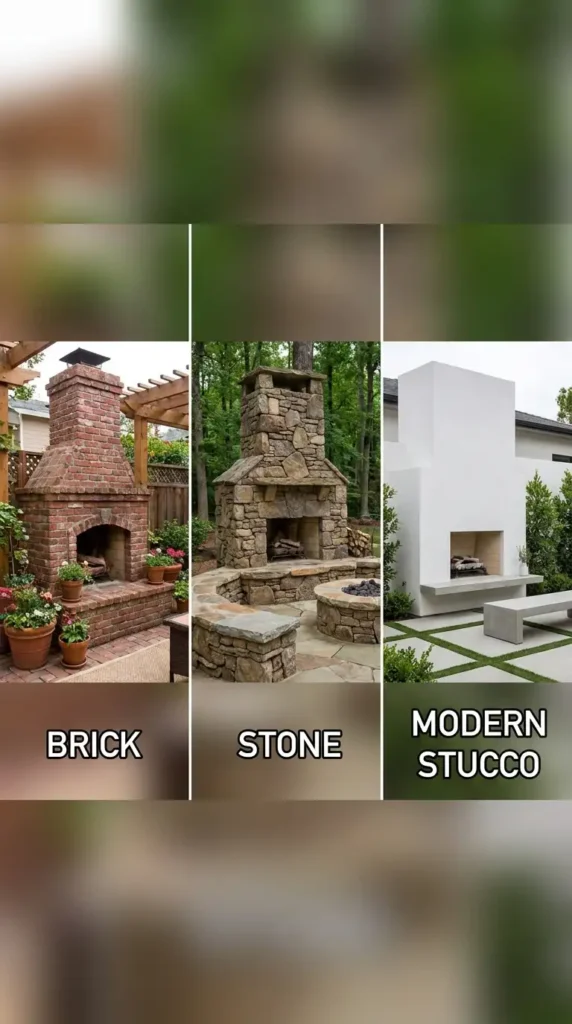
The Classic Brick DIY Outdoor Fireplace
This is probably the most popular choice for homeowners building their first diy outdoor fireplace. A classic brick fireplace has a timeless appeal that works with almost any architectural style. It is strong, durable, and can be built with standard firebricks and refractory mortar. The process involves laying courses of brick in a specific pattern to form the firebox, the opening, and the chimney.
The biggest advantage of a brick outdoor fireplace is its longevity. A properly built brick diy outdoor fireplace can last for decades with minimal maintenance. It also handles heat exceptionally well, especially when you use firebricks rated for high-temperature exposure.
Stone DIY Outdoor Fireplace
If you want something that looks more natural and blends seamlessly with a garden or wooded landscape, a stone diy outdoor fireplace is an excellent choice. You can use natural fieldstone, flagstone, or manufactured stone veneer. The rustic texture of stone gives the fireplace a premium, almost resort-like quality.
Stone does require a bit more skill to work with because the pieces are irregular in shape. However, with patience and the right adhesive mortar, even a first-time builder can achieve a beautiful result. Many homeowners combine a concrete block core with a stone veneer on the exterior to simplify construction.
Stucco and Concrete Block Outdoor Fireplace
For a more modern or Mediterranean look, a concrete masonry unit structure finished with stucco is a fantastic option. This type of diy outdoor fireplace goes up faster than brick or stone because the concrete blocks are larger. Once the structure is built, the stucco coating can be tinted or painted to match your home’s exterior.
This style is also budget-friendly. Concrete blocks are less expensive than brick per unit, and stucco materials are affordable. The finished result can look very polished and intentional.
Also Read : 55 Stunning Outdoor Deck Ideas That Will Make You Fall in Love With Your Backyard All Over Again
Planning Your DIY Outdoor Fireplace: Location, Size, and Safety
A diy outdoor fireplace project starts with a solid plan. Jumping straight into construction without thinking things through is how projects go wrong. Spend a few hours planning and you will save yourself from expensive mistakes.
Choosing the Right Location for Your Outdoor Fireplace
Location is the single most important decision you will make. The diy outdoor fireplace should be placed at least 10 to 12 feet away from your home, any fencing, overhanging trees, and covered structures. This is not just a suggestion. It is a safety standard that protects you, your family, and your property.
Think about wind patterns in your yard. If you live in an area where wind typically comes from the west, position the fireplace so that smoke is blown away from your seating area and your home. You also want to think about drainage. The fireplace pad needs to be on ground that does not collect standing water, because moisture will degrade your mortar over time.
Check with your local municipality before you start building. Many areas require permits for permanent outdoor structures, and setback rules vary from one jurisdiction to another. A quick phone call to your local building department can save you from having to tear down and rebuild your diy outdoor fireplace.
How Big Should Your DIY Outdoor Fireplace Be?
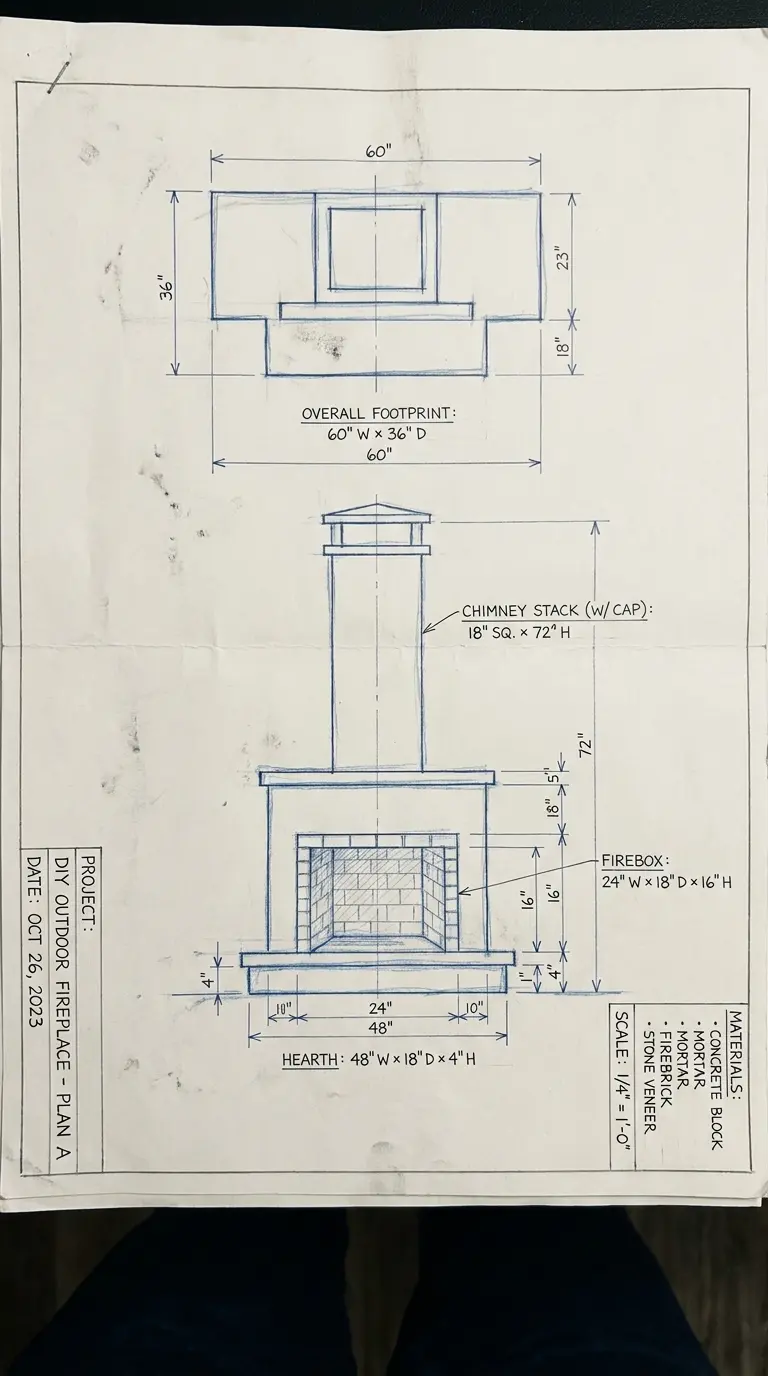
The size of your diy outdoor fireplace depends on two things: the size of your outdoor space and how you plan to use it. For a standard backyard patio, a fireplace with an opening of about 36 inches wide and 30 inches tall is a very practical size. It is large enough to put out serious heat and to burn good-sized logs, but not so large that it overwhelms the space.
Keep in mind that your firebox opening and your chimney dimensions need to follow specific ratios to ensure proper draft. The chimney opening should be no more than one tenth of the firebox volume for the fire to draw correctly. If the ratio is off, your diy outdoor fireplace will smoke excessively.
Materials You Will Need to Build a DIY Outdoor Fireplace
Getting your materials list right before you start is essential. Running back and forth to the hardware store breaks your momentum and can add days to your project. Here is a comprehensive breakdown of what you will need for a standard diy outdoor fireplace build.
Foundation Materials
Your diy outdoor fireplace needs a solid concrete foundation to prevent settling and cracking. You will need ready-mix concrete or bags of concrete mix, rebar for reinforcement, wood for building the form, and gravel for the sub-base. The pad should be at least 6 inches thick and extend at least 12 inches beyond the base footprint of the fireplace on all sides.
Do not skip the gravel base. It helps with drainage and prevents frost heave in colder climates. Frost heave is when the ground freezes and expands, pushing structures upward and cracking them. A 4 to 6 inch layer of compacted gravel under your concrete slab eliminates this problem.
Masonry Materials
For the actual structure of your diy outdoor fireplace, you will need firebricks for the firebox interior, standard construction bricks or concrete blocks for the outer shell, refractory mortar for the high-heat areas inside the firebox, and standard mortar or type S mortar for the exterior structure. You will also need stone or brick for the hearth extension in front of the firebox opening.
Refractory mortar is not optional. Regular mortar will crack and crumble when exposed to the intense heat inside a firebox. Refractory mortar is specially formulated to withstand temperatures above 2000 degrees Fahrenheit. It is widely available at masonry supply stores and some home improvement stores.
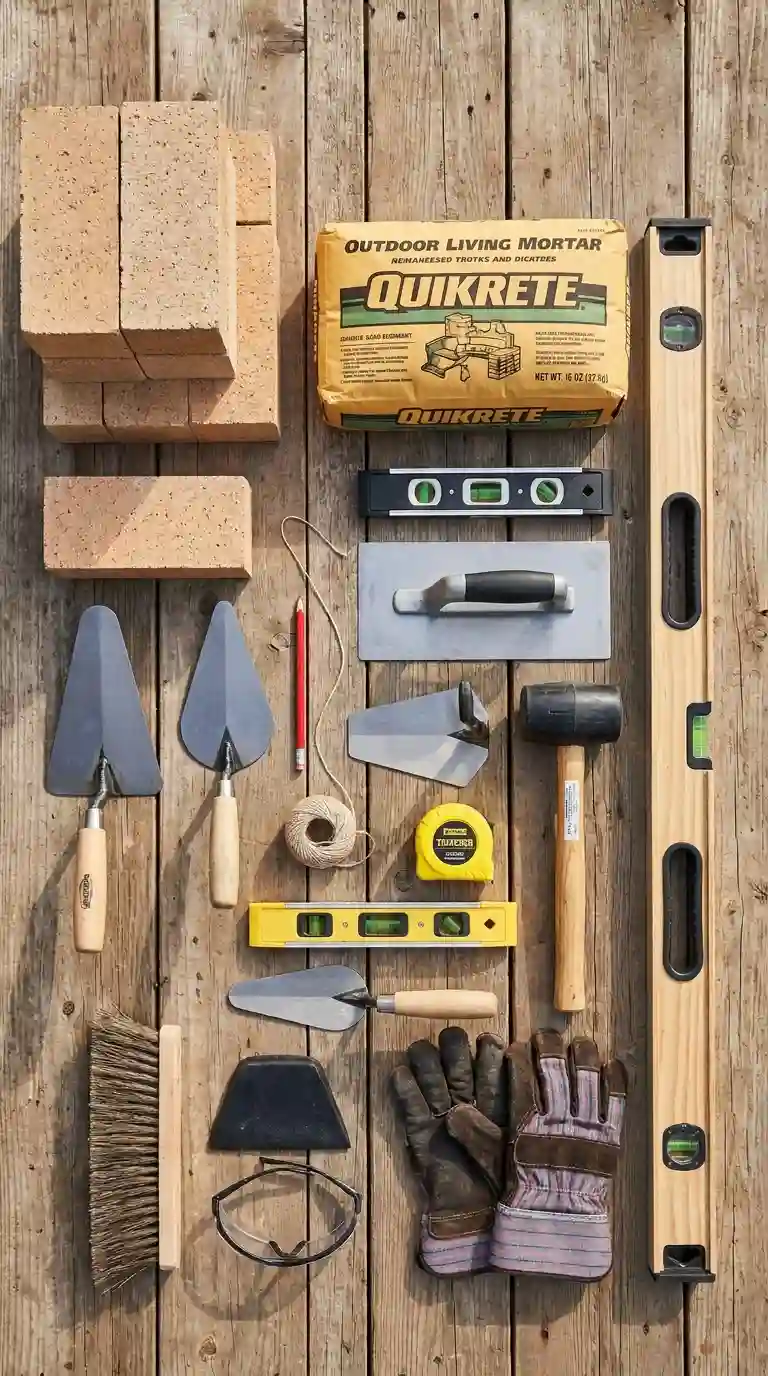
Tools Required
You will need a mason’s trowel, a brick hammer, a cold chisel for cutting bricks, a level, a tape measure, a rubber mallet, a mixing paddle and drill or a small cement mixer, a garden hose, and safety glasses and gloves. A speed square will also come in handy for checking angles. If you are building a taller fireplace with a chimney, scaffolding or a sturdy ladder is a must for safety.
Step-by-Step Instructions for Building Your DIY Outdoor Fireplace
Now we get to the heart of it. These step-by-step instructions will take you from empty ground to a fully functioning diy outdoor fireplace. Take your time with each step. Good masonry work is not rushed.
Step 1: Prepare the Site and Pour the Foundation
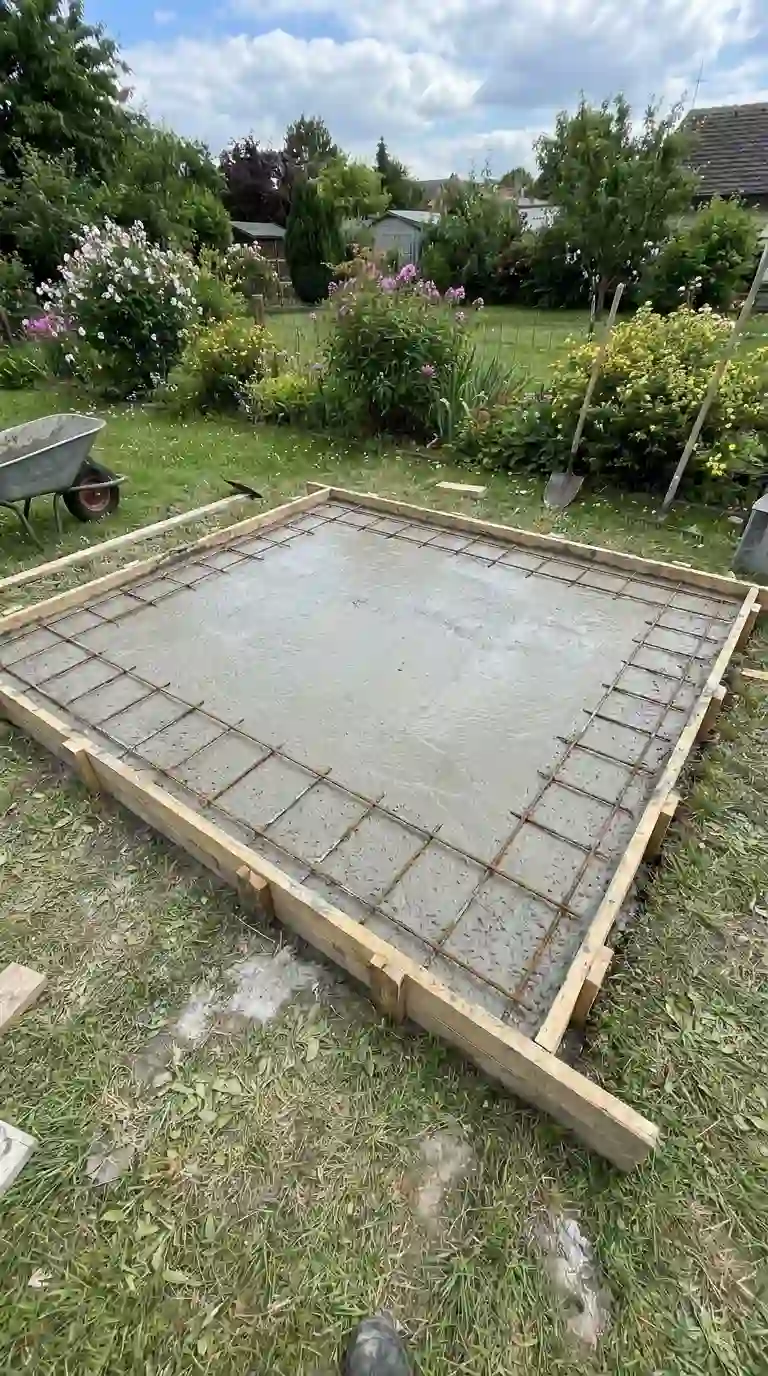
Mark out the footprint of your diy outdoor fireplace using stakes and string. Excavate the area to a depth of about 12 inches. Fill the bottom 6 inches with compacted gravel. Build a simple wood form around the perimeter of the excavation to hold your concrete. Tie rebar in a grid pattern using wire ties and set it on small plastic rebar chairs to keep it centered in the pour.
Mix or pour your concrete and fill the form. Use a screed board to level the surface. Let the slab cure for a minimum of 48 hours before laying any masonry on top of it. In cooler weather, cover the slab with plastic sheeting to slow the curing and prevent surface cracking. Concrete that cures too fast loses strength.
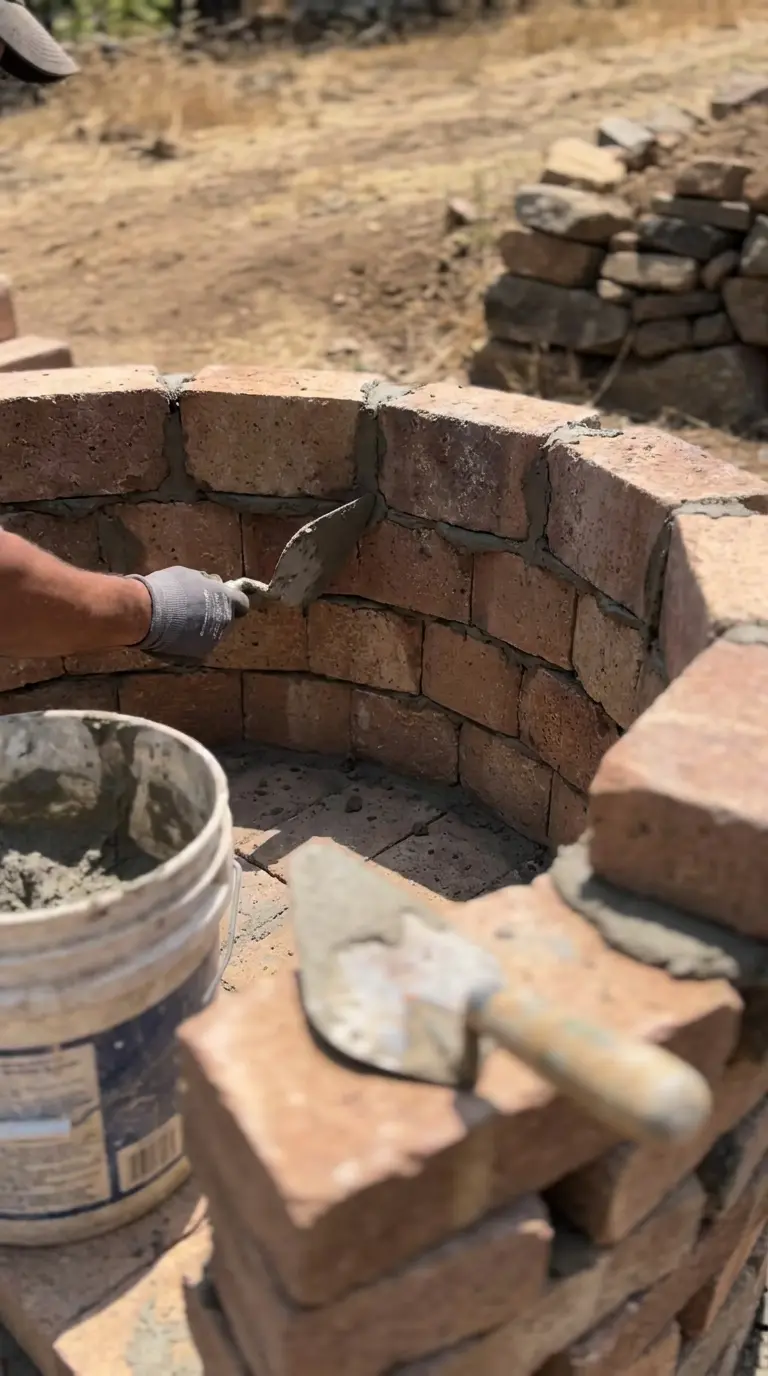
Step 2: Lay the Base Courses of Your Outdoor Fireplace
Once your slab has cured, you can begin laying your first courses of brick or concrete block. Dry-lay your first course without mortar to check your spacing and layout. This is your chance to make adjustments before anything is set permanently.
Mix your mortar to a peanut butter consistency. Spread a mortar bed on the slab and begin setting your first course of bricks. Use a level and rubber mallet to keep everything perfectly plumb and level. Check level in every direction after every few bricks. Mistakes at the base magnify as you build higher, so take your time here.
Stagger your brick joints as you build up. Staggering means that the joints of one course fall over the middle of the brick in the course below. This creates a locking pattern that dramatically increases the strength of the structure. Your diy outdoor fireplace will only be as strong as its coursework.
Step 3: Build the Firebox with Firebrick
The inside of your diy outdoor fireplace, where the fire actually burns, must be lined with firebrick set in refractory mortar. The dimensions of your firebox matter. A standard opening is about 36 inches wide, 24 to 30 inches tall at the opening, and about 20 inches deep. The back wall should slope forward slightly at the top to help direct smoke up the chimney.
This sloped section at the back is called the smoke shelf, and it sits just above where the firebox opens up into the throat of the chimney. The smoke shelf catches debris and helps prevent downdrafts from pushing smoke back into your seating area. It is a small detail that makes a huge difference in how well your diy outdoor fireplace performs.
When laying firebrick, keep your mortar joints tight. Quarter-inch joints are standard. Thick mortar joints inside the firebox will expand and contract at different rates from the firebrick and can cause premature cracking. Precision here pays off in the long run.
Also Read : Stunning Garden Curbing Ideas That Actually Work
Step 4: Frame and Build the Lintel and Arch
The opening of your diy outdoor fireplace needs a structural support at the top, called a lintel. The lintel can be a steel angle iron, a precast concrete lintel, or a soldier course of brick set in a slight arch. The arch option gives the most visual interest and is actually a very traditional masonry technique.
To build a brick arch, you will need to build a temporary wooden form, called a centering, that supports the bricks while the mortar cures. Once the mortar is fully set, you remove the wooden form and the arch holds itself in compression. This is one of the most satisfying moments in building a diy outdoor fireplace.
Step 5: Build the Chimney
The chimney is what separates a diy outdoor fireplace from a simple fire pit. A proper chimney draws the smoke upward and away from your seating area, making the fireplace genuinely enjoyable to use. Without a chimney, even a beautifully built firebox is practically unusable because of smoke.
Your chimney should be at least 2 feet taller than any roof, wall, or structure within 10 feet of it to create proper draft. In an outdoor setting, a chimney height of 8 to 10 feet above the fireplace opening is typical and effective. You can continue laying brick courses for the chimney, or you can transition to a metal flue liner surrounded by brick for simplicity.
Top your chimney with a metal spark arrestor or chimney cap. This keeps rain out of the flue, prevents birds from nesting, and stops sparks from escaping and landing on nearby surfaces. It is a small investment that protects both the fireplace and the surrounding area.
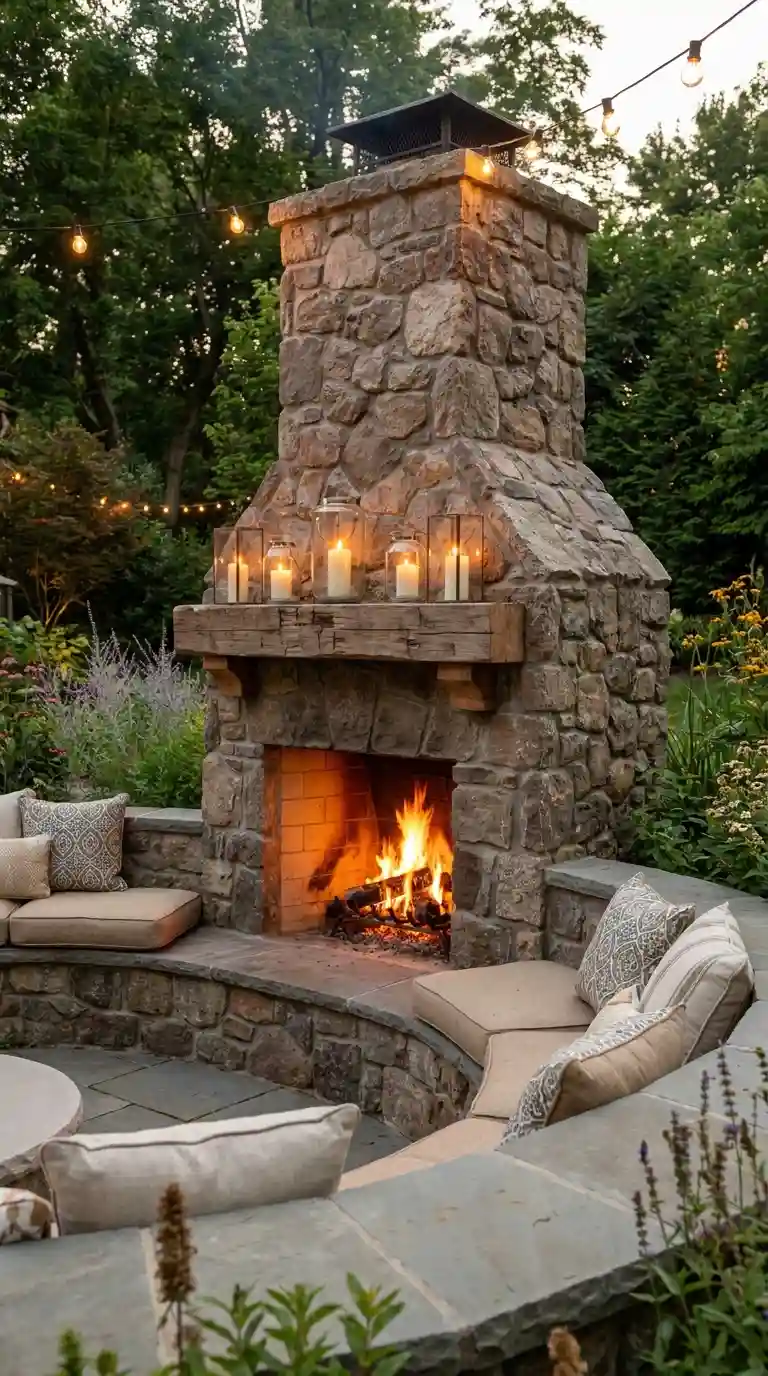
Finishing Touches That Take Your DIY Outdoor Fireplace to the Next Level
The structure is done. Now comes the part that turns a functional structure into a genuine showpiece. The finishing details of your diy outdoor fireplace are what your guests will notice and what will make you proud every single time you look at it.
The Hearth Extension
The hearth is the flat area in front of the firebox opening where embers and sparks can land safely. It should extend at least 16 inches from the front of the fireplace opening and 8 inches to each side. Use slate, flagstone, bluestone, or pavers to create a beautiful and heat-resistant hearth surface. Set the stones in mortar and fill the joints with a sand-based polymeric jointing compound.
A wide, generous hearth also creates a natural seating area. People can perch on the edge of a low hearth, kids can toast marshmallows safely from that distance, and the whole fireplace feels more welcoming with that extra horizontal space in front of it.
Mantels and Shelving
Adding a mantel to your diy outdoor fireplace gives it a real architectural presence. A mantel can be made from a thick slab of reclaimed wood, a rough-hewn timber, a cast concrete beam, or a traditional brick-and-mortar shelf. Whatever material you choose, the mantel should be at least 12 inches above the top of the firebox opening to stay safely away from the heat.
A mantel also gives you a place to display outdoor lanterns, potted herbs, seasonal decorations, or framed photos. It transforms the fireplace from a heat source into a true design element and living space centerpiece.
Seating Walls and Built-In Benches
One of the best things you can do while you have your masonry tools out is build low seating walls flanking your diy outdoor fireplace. These L-shaped or U-shaped walls create a defined outdoor room, provide ample seating without requiring you to haul chairs in and out, and reinforce the sense that the fireplace is the heart of an intentional outdoor living space.
Top the seating walls with smooth capstones for comfortable seating. You can also add cushions with outdoor-rated fabric for extra comfort. Many homeowners find that once they have built-in seating around their diy outdoor fireplace, they use the space far more often than they expected.
DIY Outdoor Fireplace Safety Tips You Should Never Ignore
Building and using a diy outdoor fireplace comes with real responsibilities. Fire is beautiful, but it demands respect. These safety guidelines are not optional. Follow them every time you use your fireplace.
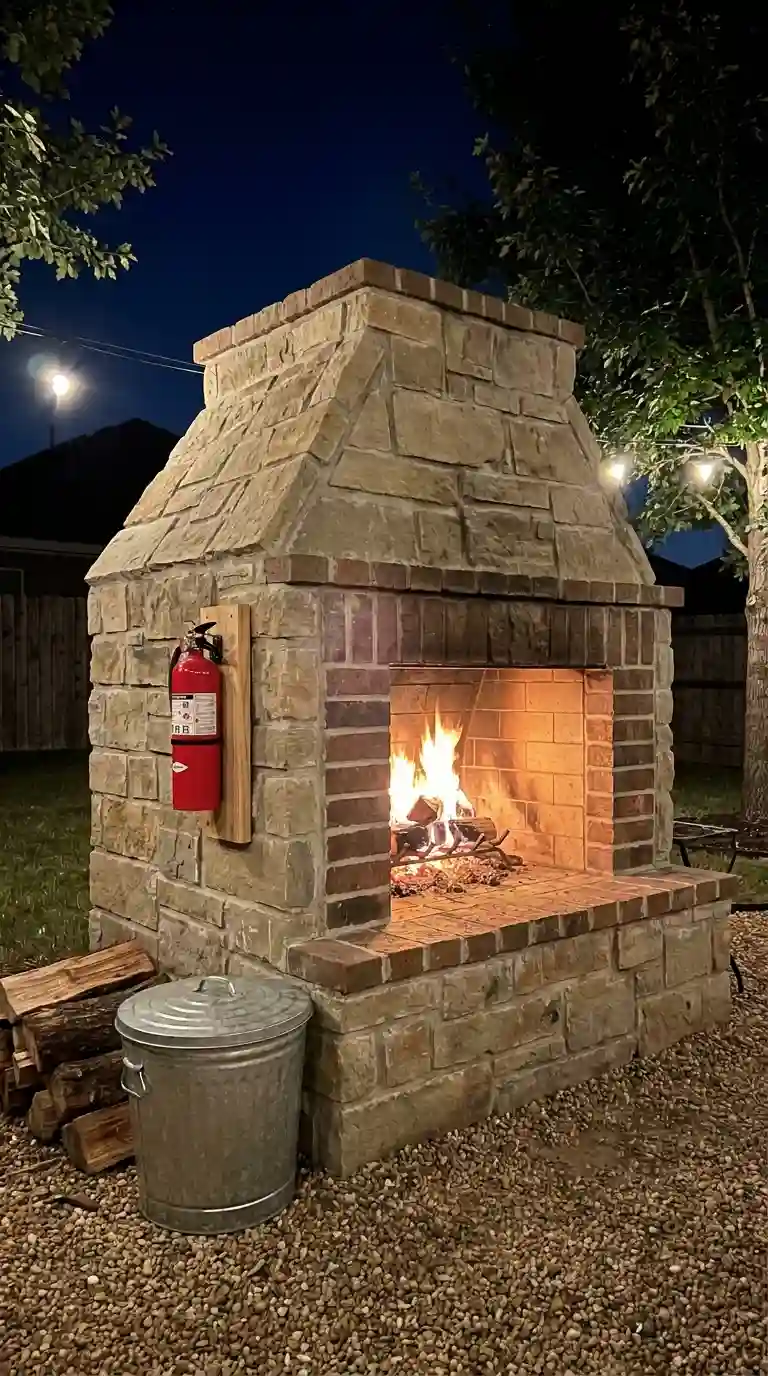
Always keep a fire extinguisher within reach when using your diy outdoor fireplace. A bucket of water or sand also works as a quick backup. Never leave a fire unattended. If you need to go inside, fully extinguish the fire first. Keep children and pets at a safe distance from the open firebox at all times.
Only burn seasoned hardwood in your diy outdoor fireplace. Seasoned wood has been dried for at least six months and burns cleaner and hotter than green wood. Never burn treated wood, painted wood, plywood, cardboard, or garbage in your outdoor fireplace. These materials release toxic fumes and can deposit harmful residues inside your chimney.
Clean the ash out of your diy outdoor fireplace regularly. Ash buildup reduces airflow and can lead to incomplete combustion and excess smoke. Store removed ash in a metal container with a lid, away from anything flammable. Ash can retain heat for up to 72 hours.
How to Maintain Your DIY Outdoor Fireplace Through Every Season
Your diy outdoor fireplace is a permanent outdoor structure, and like all outdoor structures, it needs regular care to stay in great condition. A little maintenance goes a long way in preserving both the appearance and the safety of your fireplace.
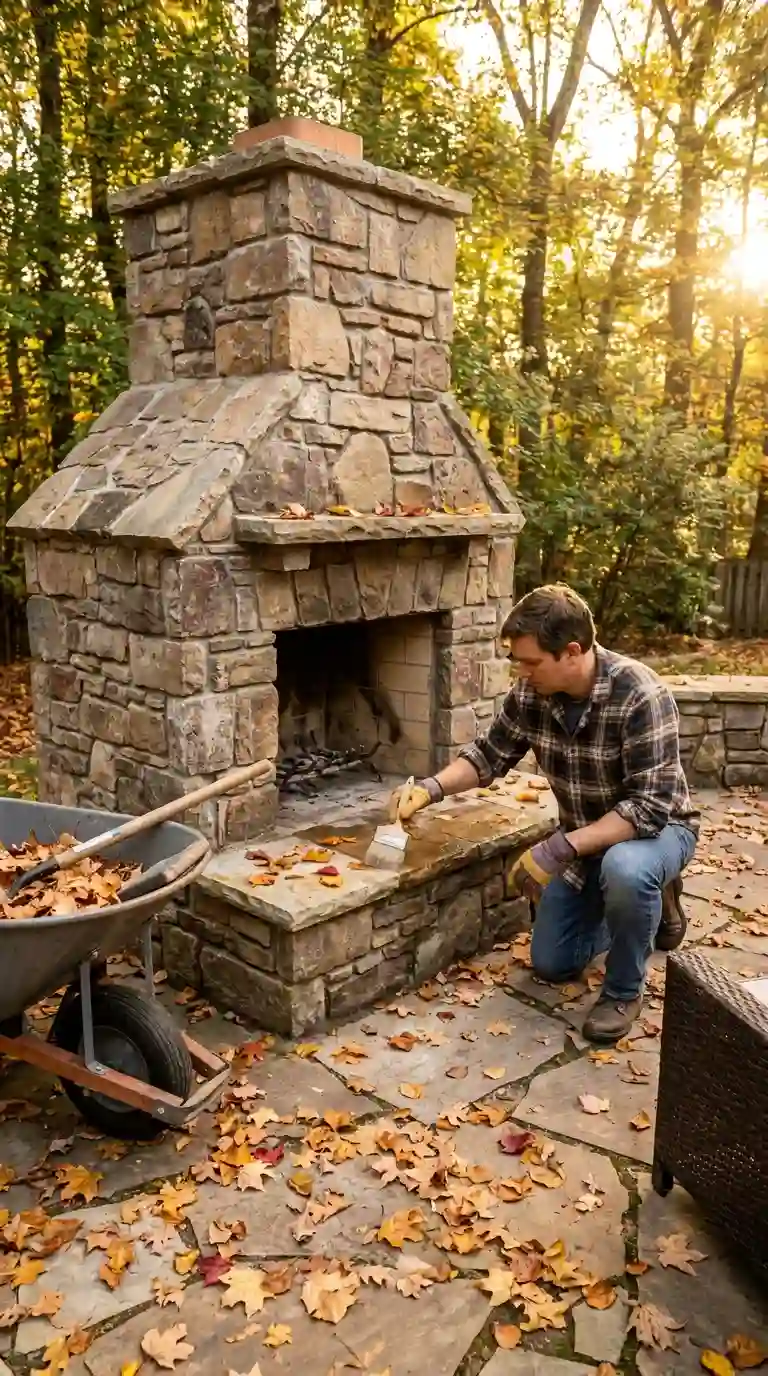
Spring Maintenance
After winter, inspect your diy outdoor fireplace thoroughly. Look for cracks in the mortar joints, especially inside the firebox. Freeze-thaw cycles can cause mortar to expand and contract, leading to small cracks that, if ignored, become big problems. Repoint any cracked or crumbling mortar joints using matching mortar. Wire-brush the firebox interior to remove ash and soot buildup.
Check the chimney cap and spark arrestor. Winter storms can loosen them. Make sure the cap still sits flush and the screen is intact. A damaged spark arrestor should be replaced immediately before you light your first spring fire.
Fall and Winter Preparation
Before cold weather sets in, do a full inspection of your diy outdoor fireplace. Apply a masonry sealer to the exterior surface of the brick or stone. Sealer prevents moisture from penetrating the masonry and reduces the damage from freeze-thaw cycles. Use a sealer rated for outdoor masonry and apply it on a dry day when temperatures are above 40 degrees Fahrenheit.
Cover the firebox opening with a custom-fitted metal cover or with a heavy waterproof tarp if you are not going to use the fireplace during the winter months. This keeps rainwater and debris out of the firebox and chimney, reducing the amount of cleaning you need to do in the spring.
Creative Design Ideas to Make Your DIY Outdoor Fireplace Unique

The best part about building your own diy outdoor fireplace is that you have total creative control. You are not limited to a catalog of predefined options. You can design something that is genuinely personal and specific to your space, your taste, and your lifestyle.
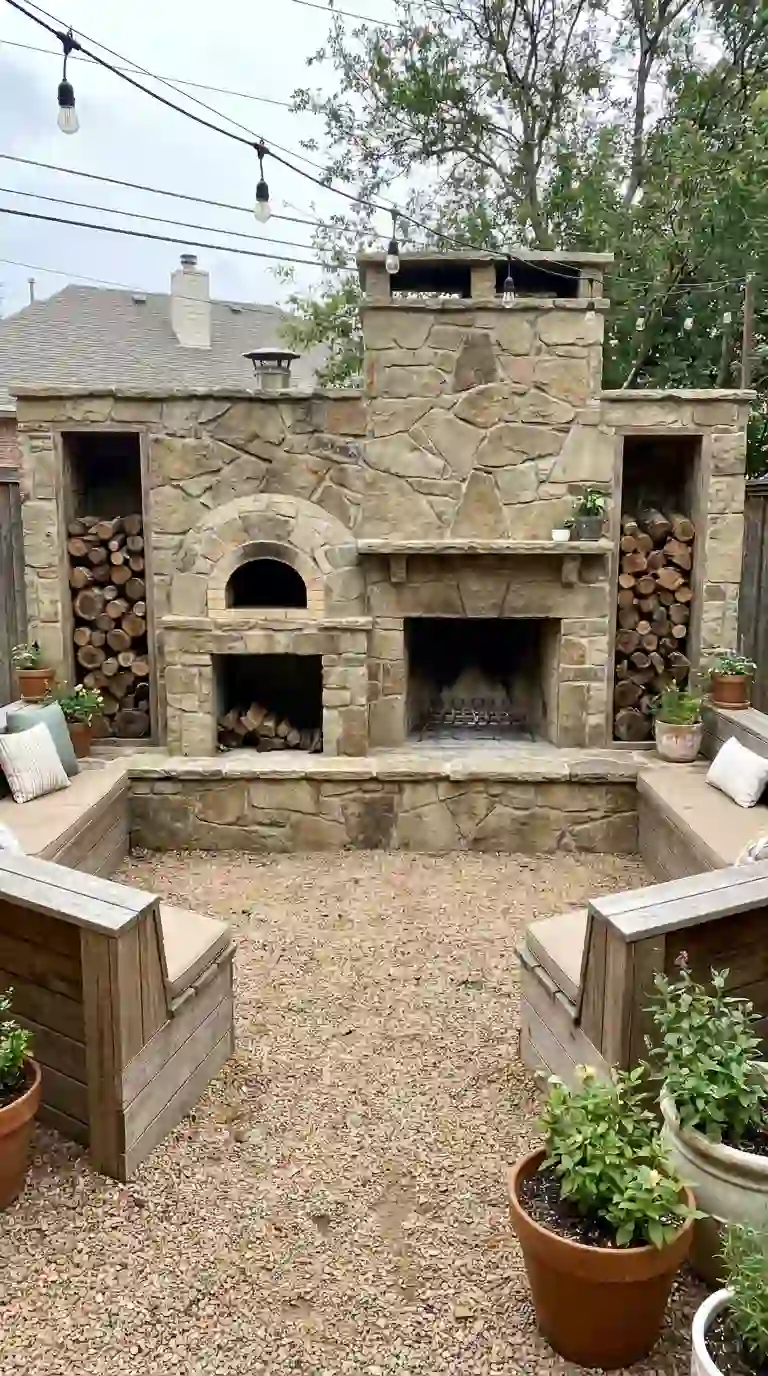
Incorporate a Pizza Oven or Grill Grate
One of the most popular upgrades homeowners add to their diy outdoor fireplace is a built-in cooking capability. You can include a grill grate that slides into the firebox opening, or you can design a separate compartment above or beside the main firebox that functions as a wood-fired pizza oven. This turns your fireplace into a full outdoor kitchen feature.
If you are going the pizza oven route, the dome-shaped interior of the oven needs to be lined with specific firebrick and finished with a layer of insulating refractory concrete. The temperature inside a wood-fired pizza oven can exceed 700 degrees Fahrenheit, so the right materials are absolutely critical for safety and function.
Add Decorative Stone Veneer Accents
If you built the structural core of your diy outdoor fireplace from concrete blocks, covering it with a decorative stone veneer gives you the look of a natural stone fireplace at a fraction of the cost. Stone veneers are thin slices of real or manufactured stone that adhere directly to the masonry surface using a polymer-modified mortar.
Choose a veneer that complements your home’s exterior palette and the surrounding landscape. Ledgestone and fieldstone veneers are perennially popular for outdoor fireplaces because they have that rugged, organic quality that fits naturally in garden settings.
Design an Outdoor Fireplace with Flanking Storage Niches
Storage is always a welcome feature in an outdoor living space. When designing your diy outdoor fireplace, consider including open niches on either side of the firebox. These niches can hold stacks of firewood, keeping them dry and easily accessible. Or you can use them to store outdoor lanterns, gardening tools, cushions, or other items you want close to hand but not underfoot.
Arch the tops of the niches for a more traditional look, or keep them square for a more contemporary feel. Either way, built-in storage makes the fireplace structure more functional and eliminates the need for additional outdoor storage solutions.
Budget Breakdown: What Does a DIY Outdoor Fireplace Actually Cost?
One of the most common questions people have before starting a diy outdoor fireplace project is how much it is going to cost. The honest answer is that it depends heavily on your design, your local material prices, and whether you already own your tools.
A basic diy outdoor fireplace built from standard brick with a simple chimney will typically run between 1,500 and 3,000 dollars in materials. A larger stone or custom design with a pizza oven, seating walls, and premium finishes can go anywhere from 4,000 to 8,000 dollars in materials. Compare that to a professionally built outdoor fireplace, which typically costs between 15,000 and 30,000 dollars or more, and the savings of doing it yourself are enormous.
The biggest material costs are usually the firebrick, the refractory mortar, the facing brick or stone, and the concrete for the foundation. Tools can often be rented if you do not already own them, which keeps upfront costs down. Renting a small concrete mixer, for example, is much cheaper than buying one for a single project.
Common Mistakes to Avoid When Building a DIY Outdoor Fireplace
Experience is a great teacher, but it is a lot better to learn from someone else’s mistakes than your own when it comes to permanent masonry construction. Here are the most common errors people make when building their first diy outdoor fireplace, and how to avoid every single one of them.
Skipping the permit is the first mistake. It feels unnecessary, and many people do it. But if you sell your home, an unpermitted structure can cause serious problems. Get the permit upfront.
Using the wrong mortar is another frequent error. Standard gray mortar from a bag is not suitable for the inside of a firebox. It will crack within one season. Use refractory mortar inside the firebox, full stop.
Not checking level frequently enough causes courses to drift. Check level after every two or three courses at most. Once you are several courses in, a small lean becomes impossible to fix without tearing down and restarting.
Forgetting about draft ratios is a mistake that results in a smoky fireplace. The chimney throat, the firebox volume, and the flue size all need to be proportional to each other. Use a standard fireplace design guide or an online fireplace calculator to confirm your dimensions before you build.
Rushing the concrete cure is also very common. It is exciting to see the foundation poured and you want to start laying brick immediately. Do not. Concrete needs at minimum 48 hours before it can bear masonry loads. Weak foundation concrete will crack under the weight of a brick chimney.
Inspiring DIY Outdoor Fireplace Ideas from Real Homeowners
Sometimes the best inspiration comes from seeing what other people have actually built, not from staged magazine photos or professional renders. Real homeowners with real backyards have created some incredibly beautiful diy outdoor fireplace setups using the same basic techniques and materials described in this guide.
One homeowner I know built a gorgeous L-shaped fireplace and grill combination in her backyard using old reclaimed brick from a demolished building. The aged, weathered brick gives the structure a patina that looks like it has been there for a hundred years. She added a live-edge cedar mantel and flanking stone seating walls, and the whole project cost her just under 2,800 dollars in materials over two weekends.
Another builder chose a very modern approach, using clean-lined concrete blocks finished with smooth white stucco and black grout lines. He kept the design simple and geometric, with a wide linear firebox opening and a low, broad chimney that barely rises above the top of the structure. It looks more like a contemporary sculpture than a traditional fireplace, and it is stunning in its simplicity.
These examples prove that a diy outdoor fireplace does not have to follow a template. It can reflect your personality, your home’s architectural style, and your vision for how you want to live outside.
Landscaping Around Your DIY Outdoor Fireplace
Once your diy outdoor fireplace is built, the surrounding landscape plays a huge role in how the whole space feels. The right planting and hardscaping choices can turn the area from a construction zone into a true outdoor sanctuary.
Plant low-growing ornamental grasses, lavender, or rosemary along the edges of your patio area. These plants are aromatic, drought-tolerant, and safe to have near a heat source because they are low and ground-level. Avoid planting anything directly next to the fireplace structure. Give it at least 4 to 5 feet of clearance on all sides.
String lights overhead, a gravel pathway leading from the house to the fireplace, and a few large potted plants can complete the look beautifully. The fireplace gives you a destination, and the landscaping gives you a journey to get there.
Frequently Asked Questions
1. Do I need a permit to build a DIY outdoor fireplace?
In most areas, yes. Permanent masonry structures like a diy outdoor fireplace typically require a building permit. Rules vary significantly by city, county, and state, so check with your local building department before you start construction. Getting a permit protects you legally and ensures the structure is inspected for safety.
2. How long does it take to build a DIY outdoor fireplace?
A basic diy outdoor fireplace can be completed in two to three weekends of dedicated work. More complex designs with pizza ovens, seating walls, and decorative stone veneers can take four to six weekends. Factor in curing time for your foundation concrete and mortar joints, which adds time but cannot be skipped.
3. What kind of bricks should I use for my outdoor fireplace?
Use firebricks rated for high-temperature exposure inside the firebox. Standard construction bricks or veneer bricks can be used for the exterior. Never use regular bricks inside the firebox because they will crack and spall from the heat. Always use refractory mortar for the interior masonry.
4. How do I prevent my outdoor fireplace from smoking?
Proper chimney design is the key. Make sure your chimney is tall enough, your firebox-to-flue ratio is correct, and that you are burning dry seasoned wood. A smoke shelf above the firebox opening also helps. If you already have a smoky diy outdoor fireplace, have the chimney inspected for blockages and check the flue sizing.
5. Can I build a DIY outdoor fireplace on a wood deck?
It is not recommended. A masonry fireplace is extremely heavy and can compromise the structural integrity of most wood decks. Additionally, the fire hazard of having an open flame on a wood surface is serious. It is much safer and more practical to build your diy outdoor fireplace on a concrete pad on the ground.
6. How do I choose between a wood-burning and gas outdoor fireplace?
A wood-burning diy outdoor fireplace is more traditional and less expensive to build, but requires more maintenance and ongoing wood costs. A gas fireplace is more convenient with instant ignition and no smoke or ash, but requires a gas line installation and is more expensive upfront. Most homeowners who enjoy the camping fire experience prefer wood burning.
7. What is the best foundation for an outdoor fireplace?
A reinforced concrete slab at least 6 inches thick, sitting on a compacted gravel base, is the standard and best foundation for a diy outdoor fireplace. The gravel prevents frost heave and the concrete provides the stable, load-bearing base the masonry structure requires.
8. How much does it cost to hire someone to build an outdoor fireplace versus DIY?
Professional masonry contractors charge between 15,000 and 30,000 dollars or more for a custom outdoor fireplace. A diy outdoor fireplace built by the homeowner typically costs 1,500 to 8,000 dollars in materials depending on size and design. The DIY savings can be enormous while producing a result you can be personally proud of.
9. What type of wood burns best in an outdoor fireplace?
Seasoned hardwoods like oak, hickory, maple, ash, and cherry burn the best. They produce more heat per log, burn longer, and generate less creosote than softwoods. Avoid pine, cedar, and other resinous softwoods as they burn fast, produce more smoke, and deposit more creosote in your chimney.
10. Can I add a grill or cooking surface to my DIY outdoor fireplace?
Absolutely. Many homeowners build a swing-arm grill grate or a fixed cooking grate directly into the firebox opening of their diy outdoor fireplace. You can also build a separate wood-fired pizza oven compartment as part of the same structure. These additions are planned during the design phase and built into the original structure.
11. How far should patio furniture be from an outdoor fireplace?
The general recommendation is to keep seating at least 3 to 4 feet away from the front of the firebox opening. Built-in seating walls set at that distance are ideal. Freestanding chairs and sofas should never be placed so close that the fabric or cushions could be ignited by a spark or ember.
12. How do I clean an outdoor fireplace?
Remove ash when the fire has been fully cold for at least 24 hours. Use a metal ash scoop and place ash in a metal container. Brush down the interior firebox walls with a stiff wire brush. Inspect the mortar joints for cracks seasonally. Clean the exterior brick or stone with a mild masonry cleaner and a stiff scrub brush as needed.